Into The Gauntlet: The Mastering of Shawn Rose
This episode of Into The Gauntlet is a bit more personal (and lengthy). I invite you into the seat of the mastering engineer as I share my experience mastering Shawn Rose’s When I Need You. It was a month-long challenge where I competed against a fellow mastering engineer, Christian Caicedo of Envious Audio. Together, we went head-to-head mastering tracks for free that were submitted to us. The artists get to keep both masters, and in return, they just tell us which was their favorite!
Follow Shawn Rose:
![]()


I dive in deeper than usual this time during the A/B comparison between Christian’s master and mine, mixing tips for the song and the lessons I learned during this challenge. As I demonstrate my mastering approach, I share my experience growing as a mastering engineer.
The Mastering of Shawn Rose
There’s no TLDR here. I covered a lot of ground. I also wasted a lot of time experimenting with not one, not two, but three mastering chains! Throughout the session, the battle was working with an imbalanced mix that had too much low-end content. I was trying to recreate a sonic character from a reference that Shawn’s production simply wasn’t designed to emulate.
If you’re familiar with the metaphor for a square peg in a round hole…
Weakness can become strength
The silver lining in this head-game I was playing against myself is in the mastering project template I’ve adapted over the years. This current iteration within Cakewalk by Bandlab makes auditioning entire chains straightforward without having to reload sessions, plugins, or duplicate audio data.
Let’s talk about real-estate and workflow for a minute. By now, you may have become familiar with my layout. There are two tracks for importing references. There is a track set up to feed out to aux-tracks that I can drop a stereo mix in quickly and then duplicate the track with its properties without the audio data.
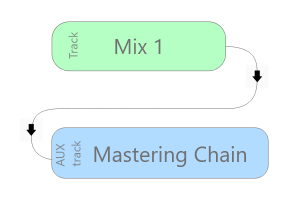
I find it easy to ingest newly updated mixes when necessary and still keep the previous versions on-hand and quickly accessible.
The mastering chain resides in the Aux track, where the bulk of the processing is being done.
Cakewalk utilizes “patch points,” which allow you to flexibly route audio anywhere without creating discrete sends and returns the way Pro Tools or other DAW’s do. This is more akin to Reason, without the visuals.
The preview tracks are routed to a preview bus which shares the same hardware outputs as the master bus. I can have identical analyzer tools on both the preview and master bus to measure the output of the references. I can also individually inspect both outputs with tools I’ve mentioned previously: Youlean Loudness Meter Pro 2, and Voxengo Span Plus.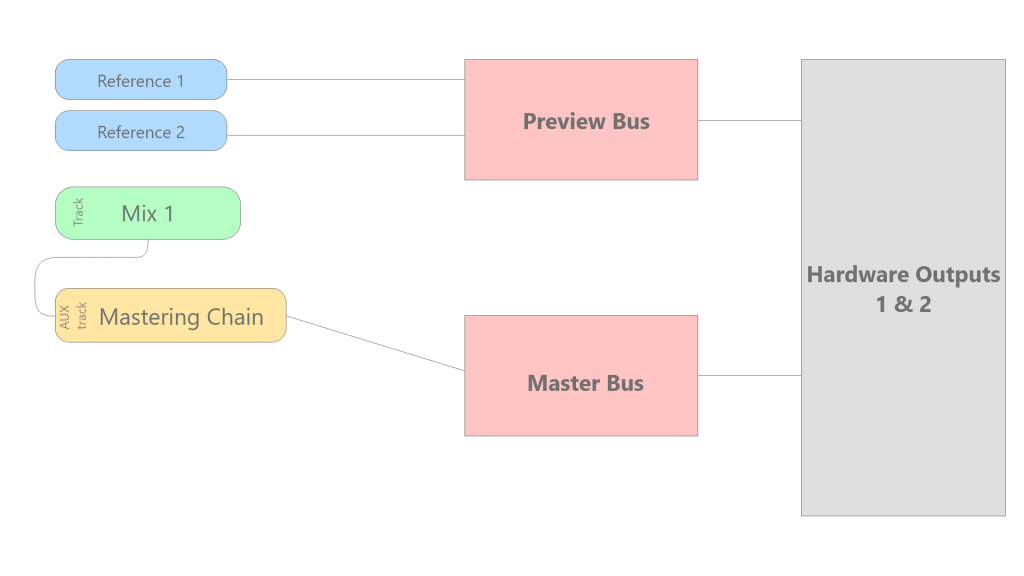
I can easily duplicate the mix track to retain its properties like gain, volume, and even automation data. I can choose not to copy the audio clip(s) in that track, which simplifies the process of quickly importing a newly updated mix.
I can also duplicate the Aux track since the input is being routed through the same patch-point, and there is negligible overhead in CPU utilization with this implementation. This is how I’m able to quickly create and audition multiple mastering chains.
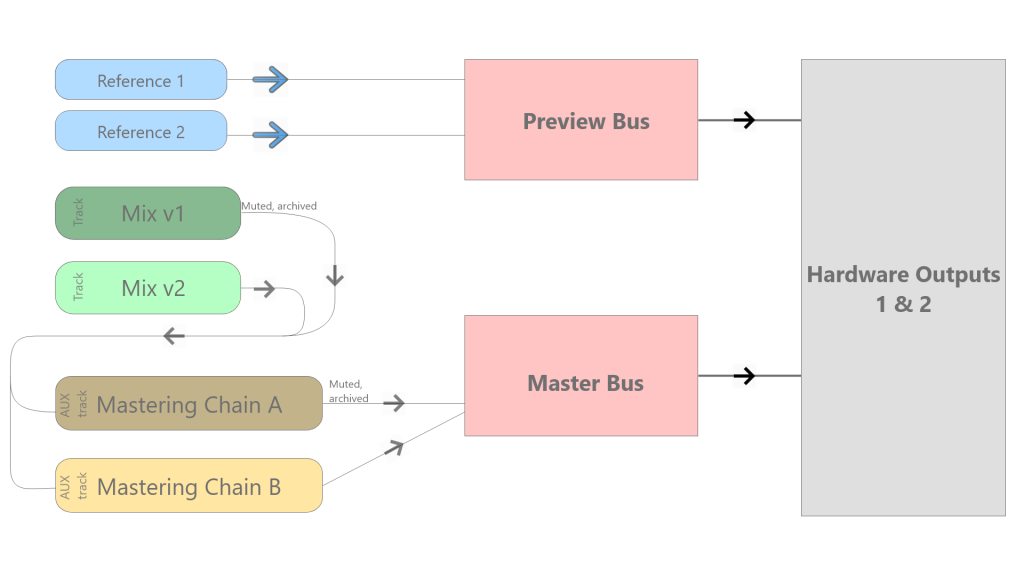
Thanks to Cakewalk’s automation grouping features, I have groups created for the reference track mutes set so that they toggle between each other. The same is set for the mastering chain tracks, preview, & master bus mutes.
This template design is what allowed me to test out three separate mastering chains and still make the deadline. The less time spent fiddling with technology and stay in the flow-state, the higher chance there is of staying in the realm of the highest quality outcome.
The loudest culprit
During the A/B comparison, I discovered Christian’s master still had a fair bit of headroom. What was happening between his and mine that resulted in such a dramatic difference?
- Preserving the mix: from Christian’s master, appeared to also maintain the enormous low-end. He did a decent job of managing it because there was still clarity and transparency in the master as the loudness was raised.
- Contouring for tonal balance: in my case, meant sacrificing low-end for achieving a tonal and loudness target result that more closely mimicked Seven Lions’ reference track.
Equalization is actually the opposite
I describe that being heavy-handed with EQ in the low frequencies is critical work because phase shifting can cause unwanted artifacts. Phase shifting occurs in a couple of measurable ways:
- Analog Style EQ’s introduce unwanted phasing artifacts that Dan Worral does an excellent job of describing in the tutorial video he built for FabFilter.
- Linear Phase EQ’s don’t present the phasing problem that traditional EQ does, but can introduce pre-ring.
There was no winning this battle of achieving a balance between low-end and mix preservation. To me, the final master I submitted still felt a little hollow and lifeless in the sub and bass regions but allowed for clarity in the kick and the upper registers of the mix to become the focal point.
Why might this occur? Who mixes their kick and sub with so much bass? It comes down to understanding what’s happening in your listening environment, and calibrating your playback system as best you can to approach a linear response that more closely matches the input of what you’re feeding your speakers.
What can you do?
- Use calibration software like IK Multimedia’s Ark, Sonarworks Reference 4, or something similar.
- Learn and calibrate your mixing & mastering environment for a standard like K-metering.
- Use analytics tools to visually confirm correlations between what you’re hearing and what’s actually in the signal.
I also suggest in this episode that artists practice mixing into mastering chains. This is where I feel I need to play devil’s advocate with myself. I would only recommend exploring this avenue as a reference master because you can quickly mix yourself into a corner if you’re unsure of what you’re doing. For this reason, I recommend starting with a simple but effective mastering limiter on your master bus.
If you’re still experimenting to “find your sound,” I would recommend NOT doing this practice until you’ve found your sound. This can significantly prolong the process and add to your frustration. I’m not saying it’s impossible to accomplish. Still, more often than not, the discovery of this method too early certainly causes more “oo-shiny” syndrome than anyone needs to endure.
If you feel you’re ready to explore this method, here is how I recommend starting:
- Pick good reference songs to A/B and compare them with: tonal balance, overall energy, and perceived loudness or presence of the various elements in the mix.
- Don’t set the volume of the reference to match your mixing level, push your mix into the mastering limiter until you’re hitting roughly the same loudness as the reference.
Traditionally, folks will pull in commercially mastered records and then turn down the volume of the reference until it’s roughly the same intended level as their mix.
When you mix this way, you can undoubtedly get a great sounding mix that sounds identical to the mastered reference. Yet, when you push the mix into a mastering chain, you’ll run into issues attempting to hit the same loudness level that the commercially mastered reference is hitting.
Flip the script. Send your mix into the limiter and force the limiter to push the mix to start hitting roughly the same loudness as the mastered reference. This will reveal just what is happening to your mix at that loudness level.
I’ve already had a few people ask me about this specific approach, and why they can’t get to that same loudness level. I plan on making an episode dedicated to this approach soon!
Your Burning Questions Answered!
I hope you found this episode of Into The Gauntlet: the Mastering of Shawn Rose helpful. If you have questions on production, mixing, or mastering, please submit them to TheGauntlet@neologicstudios.com. If you haven’t already visited my Patreon, please consider becoming a member or making a custom pledge!
Need your song mastered? I offer free mix critiques and mastering previews! Reach out to me with a brief description of your project, and what your goals are with this release and your brand! I’d love to hear from you.